Shelly Motion, MQTT and Openhab

In this post I am showing you how you can setup your Shelly Motion and integrate it into Openhab via MQTT and with a rule to automatically switch on a light on motion.
Setting up the Shelly Motion
After unboxing the Shelly Motion you will have several pieces, which are all shown in the next picture. It is the motion detector, a holder for the wall and a set of screws and the "turn on needle".

The most important thing of course is the motion sensor and the "turn on needle". Take out the needle and put it in the left small hole next to the charger and press the little button for roughly 5 seconds to turn it on.

The config of the Shelly motion the same as for other Shellys and you can check here how it is done.
In short, this is what you have to to:
- Connect to the Shelly Motion WiFi
- Open 192.168.33.1
- Connect the Shelly Motion to your network
- Find out the new IP of your Shelly Motion
- Open that IP
- Update to the latest firmware
- Set the CoIOT IP adress to your Openhab IP
- Set up MQTT with your MQTT setting
The last two steps are new. Step 7 is necessary for the Shelly Motion binding of Openhab as it does not work without it. (Frankly I could not get it running even with this enabled. If you did it, I would be glad to hearing from you how you were able to do it).
Since the normal binding did not work, step 8 is necessary and I am going to show you how to implement it via MQTT.
Setting up of MQTT
The easiest way to setup and use MQTT is by using a docker image. You can read here how it is done, this is a very straight forward way to getting it done.
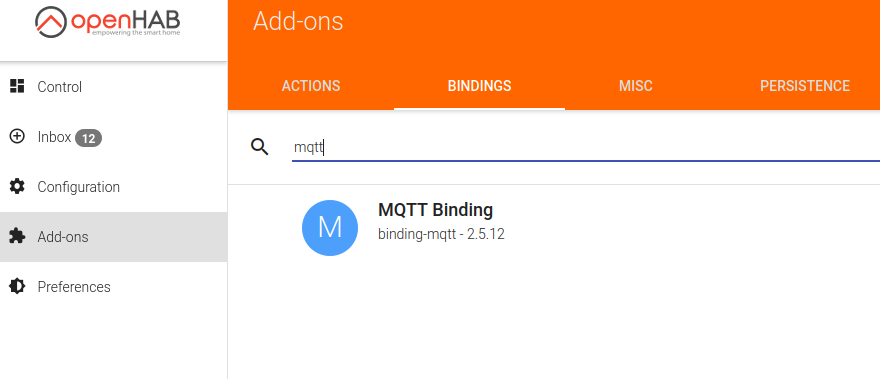
After the MQTT server is running, you also need to install the MQTT binding in Openhab. Which you can do via the Openhab Paper UI or in your config.
In the Paper UI you have to navigate to AddOns -> Bindings and then install the MQTT binding.
Now you are all set to get your Shelly Motion running via MQTT in Openhab.
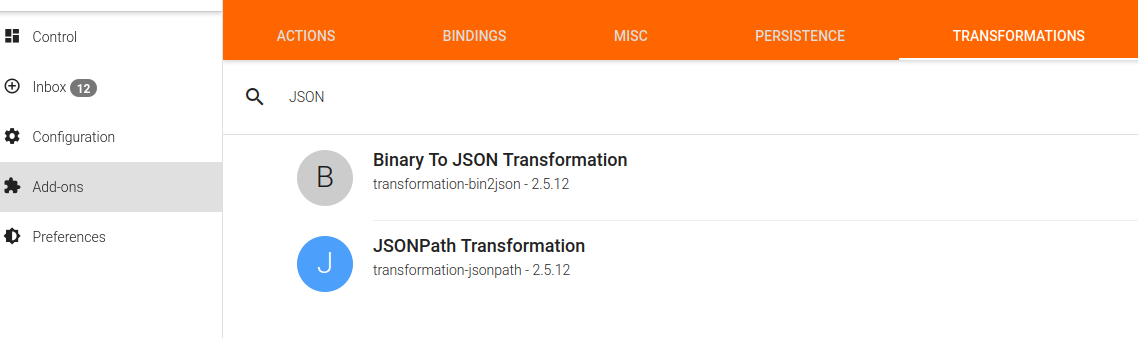
In addition you need the JSONPath transformator as the data is stored in JSON in the MQTT.
Implementing Shelly Motion via MQTT in Openhab
Since MQTT is a publish/subscriber model you cannot use it as straight forward as a normal thing and item. To get it running you will need to use a MQTT bridge and use the Shelly Motion as thing in that bridge.
To do so go to your things file (typically I am creating a new one for this called mqtt.things) and add the following code:
Bridge mqtt:broker:MyMQTTBroker [ host="192.168.xx.xx", secure=false, clientid="Oh2MyMQTTBroker", qos=1, retain=false] {
  Thing topic shelly_shellysense_xxxx "Motion Detector Living Room" @ " Living Room" {
    Channels:
      Type switch : Motion  [stateTopic="shellies/shellymotionsensor-xxxx/status" , on="true", off="false", transformationPattern="JSONPATH:$.motion"]
      Type number : Battery [stateTopic="shellies/shellymotionsensor-xxxx/status", transformationPattern="JSONPATH:$.bat"]
      Type number : Lux [stateTopic="shellies/shellymotionsensor-xxx/status", transformationPattern="JSONPATH:$.lux"]
  }
}
You will need to exchange the xxxx with your Shelly Motion id (can be found under Settings -> Device Info in your Shelly Motion web interface).
If you want to find out what your stateTopic is, you can use MQTT.fx, connect to your MQTT and scan for incoming messages.
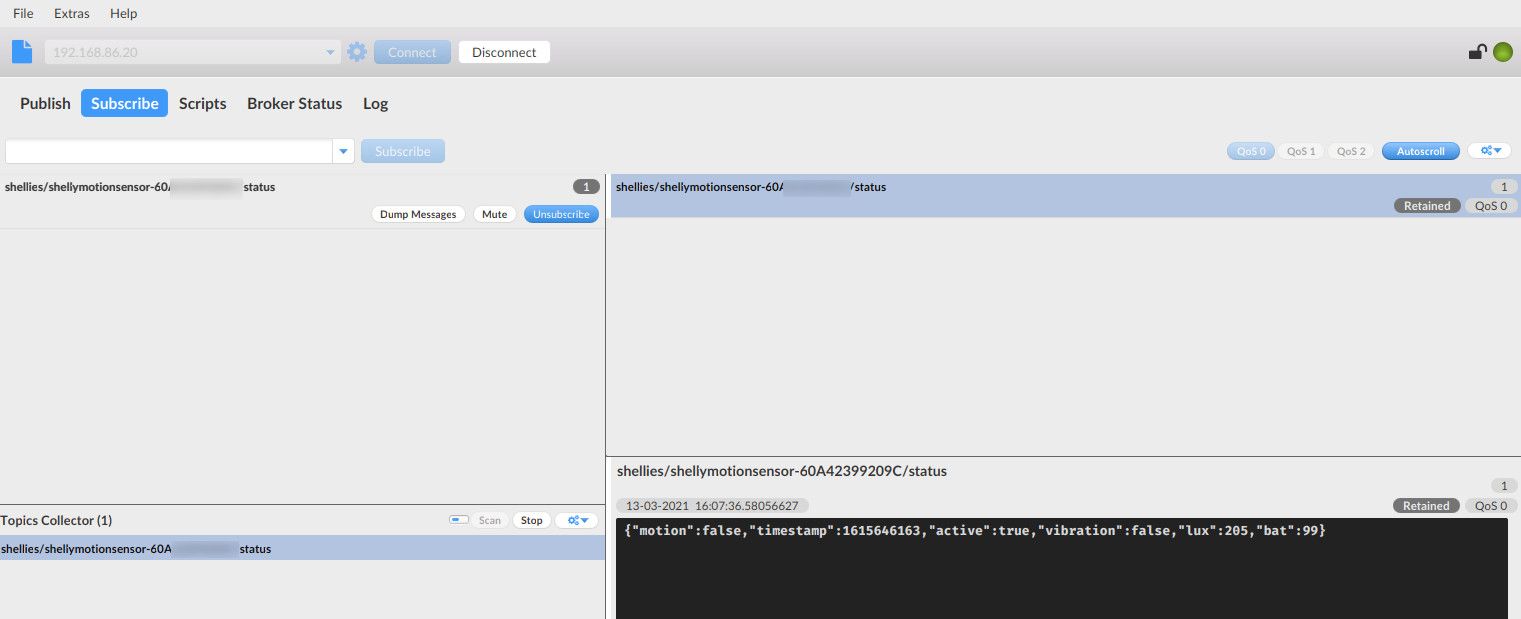
The JSON published to the MQTT looks like this:
{"motion":false,"timestamp":1615649949,"active":true,"vibration":false,"lux":160,"bat":99}
In this example you have now added a new channel to the MQTT bridge where you can get three values: Motion detected, Battery % and the Lux.
The next step is to create the items for the Shelly Motion. For this navigate to your items file and add the Shelly Motion items:
Number FF_Corridor_MS_Battery "Battery [%.1f %%]"    <battery>  (GF_Corridor)   ["MotionSensor"]    {channel="mqtt:topic:MyMQTTBroker:shelly_shellysense_xxxx:Battery"}
Switch FF_Corridor_MS_Motion "Motion detected"    <switch>  (GF_Corridor)   ["MotionSensor"]    {channel="mqtt:topic:MyMQTTBroker:shelly_shellysense_xxxx:Motion"}
Number FF_Corridor_MS_Lux "Lux [%.1f LUX]"    <light>  (GF_Corridor)   ["MotionSensor"]    {channel="mqtt:topic:MyMQTTBroker:shelly_shellysense_xxxx:Lux"}
Now you can use these items to represent you Shelly Motion in a Sitemap or a rule. Here is one example how I am using it in a Sitemap:
Text label="Corridor" icon="corridor" {
	Frame label="Lights" icon="light" {
		Switch item=FF_Corridor_Light
	}
	Frame label="Motion Sensor" icon="motion" {
		Default item=FF_Corridor_MS_Battery
		Default item=FF_Corridor_MS_Lux
        Default item=FF_Corridor_MS_Motion
    }
}
It will look like this then in your Basic UI

Setting up the rules to automate lights on/off with your Shelly Motion
The last step now is to create rules which turn on a light if there is some motion on the Shelly Motion. To do so create a new rules file in your rules folder (motionsensors.rules).
What we will do is the following:
- Detect motion set to ON (motion detected)
- Detect if it is necessary to turn on the lights (via Lux)
- Turn lights on
- Set timer of 3 minutes, once 3 minutes is reached without further motion turn off the lights
- If there is motion within 3 minutes, restart the timer
You can do this with the following rules code:
import org.openhab.model.script.actions.Timer
import java.util.concurrent.locks.ReentrantLock

//Setting the timer variable
var Timer timerFFCorridor = null
//Setting the max Lux value
var Integer lux = 25
//Setting the timeout length
var Integer minutesTimeout = 3
//Setting a lock to prevent concurrent execution
var ReentrantLock timerFFLock  = new ReentrantLock()

//If there is motion turn on the lights
rule "FF Corridor turn light on on motion"
when
    Item FF_Corridor_MS_Motion received command ON or
    Item FF_Corridor_MS_Motion received update ON
then
    //Check the current lux
    if(FF_Corridor_MS_Lux.state < lux){
        logInfo("MotionSensor", "FF_Corridor_MS_Motion triggered and LUX < 25 => Turn light on")
        //Turn on the lights => timer is set in the Lights on command
        FF_Corridor_Light.sendCommand("ON")
    }else{
        logInfo("MotionSensor", "FF_Corridor_MS_Motion triggered and LUX > 25 => Do not do anything")
        //If the timer is set and the lux is too high this means the lights are on and the timer needs to be rescheduled => Can be improved :)
        if(timerFFCorridor !== null){
            logInfo("MotionSensor", "timerFFCorridor will be rescheduled")
            timerFFCorridor.reschedule(now.plusMinutes(minutesTimeout))
        }
    }
end

//set timer when light is turned on
rule "FF Corridor turn timer on if light is turned on"
when
    Item FF_Corridor_Light received command ON or
    Item FF_Corridor_Light received update ON
then
    timerFFLock.lock()
    try{
        //Create a new timer if the timer is not yet set
        if(timerFFCorridor === null){
            logInfo("MotionSensor", "FF_Corridor_Light turned on, set timer")
            timerFFCorridor = createTimer(now.plusMinutes(minutesTimeout), [
                logInfo("MotionSensor", "timerFFCorridor expired and setting to OFF")
                //When the timer runs out, turn off the lights
                FF_Corridor_Light.sendCommand("OFF")
                //Set timer to nothing
                timerFFCorridor = null
            ])
        }else{
            logInfo("MotionSensor", "FF_Corridor_Light Timer will be rescheduled")
            timerFFCorridor.reschedule(now.plusMinutes(minutesTimeout))
        }
    } finally {
        timerFFLock.unlock()
    }
end

//set timer to null when lights are turned off
rule "FF Corridor set timer to null if light is turned off"
when
    Item FF_Corridor_Light received command OFF or
    Item FF_Corridor_Light received update OFF
then
    logInfo("MotionSensor", "FF_Corridor_Light turned off, set timerFFCorridor to null")
    //If the timer is still running and the lights are turned off, cancel the timer
    if(timerFFCorridor !== null){
        timerFFCorridor.cancel()
        //Set the timer to nothing
        timerFFCorridor = null
    }
end
Now you have to restart your Openhab and can try it out.
Site note: Whenever you make a change in your items or things, restart your Openhab as the current implementation of the MQQT binding has a bug and is struggling with "live refreshs".
I hope this is helps you set up your Shelly Motion sensor via MQTT with Openhab.
Looking forward to your feedback.