Shelly 2.5 Rollershutter and Openhab2

In my last post I have shared how to implement a Shelly 2.5 as a relay with Openhab2. In this post I want to share with you, how you can implement a Shelly 2.5 as a rollershutter in Openhab2.
In order to get the wiring done correct, please checkout my last post as the wiring will be the same for a relay and a rollershutter.
Setting up Shelly 2.5 as a rollershutter
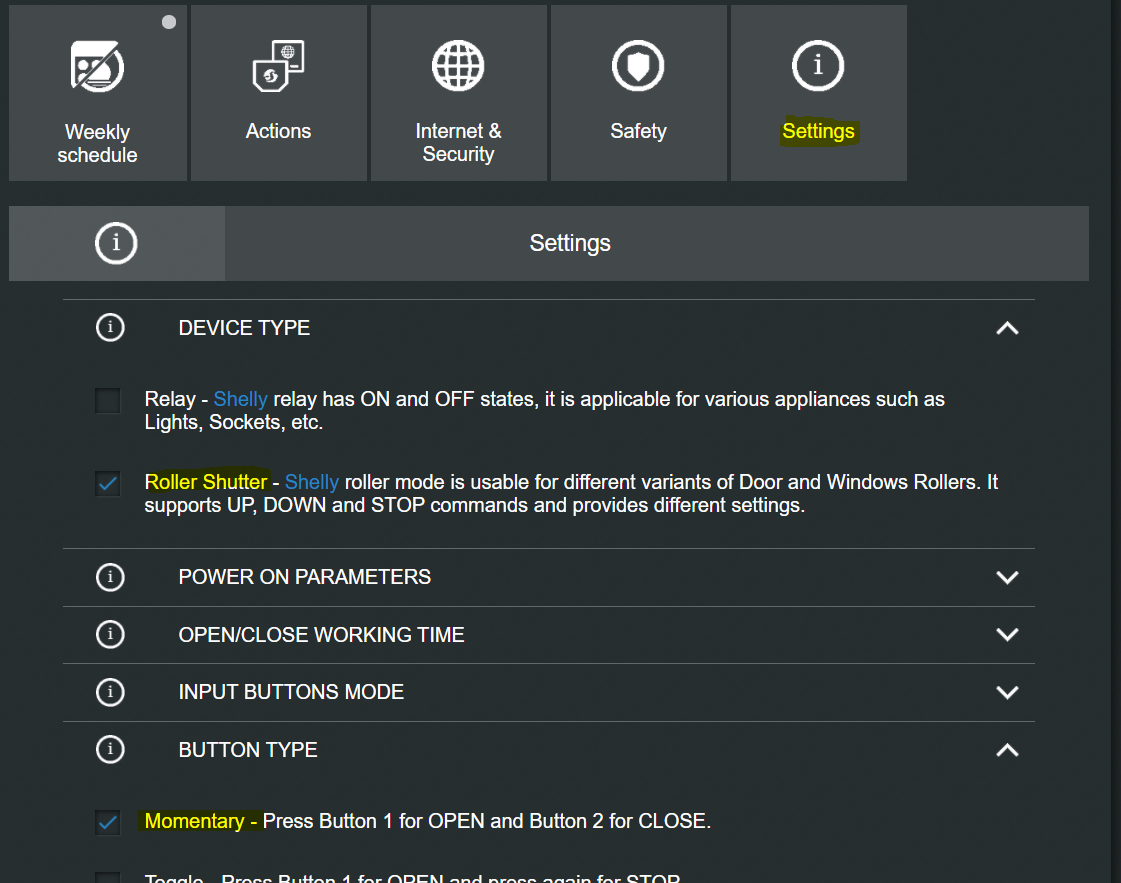
In order to set up your Shelly 2.5 as a rollershutter you have to navigate to the web interface of the Shelly. You can do that by opening a browser and key in the IP address of the Shelly. In the we interface, navigate to Settings. Then set the device type to "Roller Shutter" and the button type to "Momentary".

The "Momentary" switch is necessary if you want the hardware switch to react with every change. E.g Change down switch => Shutter goes down => Change down switch => Shutter stops. If you do not do this, it typically takes you two switches to stop the shutter: Change down switch => Shutter goes down => Change down switch => Shutter still goes down => Change down switch => Shutter stops.
In additon you should do the calibration of your shutter in order to allow controlling a position rather than only up and down. This is also under Settings and then under "Positioning Controls". Check the "Enable positioning controls" checkmark and click on "Calibrate".

Your shutter will no open, close and partially close for roughly 1 minute in order to gather the necessary data.
If in any case your up switch acually lowers the shutter, you can reverse your input by setting "Reverse directions" in the "Settings" tab.
Setting up the Shelly 2.5 rollershutter in Openhab2
First you have to add your Shelly 2.5 as a thing in your *.things file (for me this is default.things) as a shelly25-roller
Thing shelly:shelly25-roller:40F5202AXXXX "Shutter Right Bedroom (40F5202AXXXX)" @ "Bedroom" [deviceIp="192.168.XXX.236", userId="", password=""]"
Next you have to add the rollershutter to your *.items file. I have created additional groups in order to be able to steer e.g. all first floor shutters or all shutters in the bedroom at one.
Group:Rollershutter:MAX gFFShutter "Roller Shutter" <rollershutter> (Home, FF) ["Rollershutter"]
Group:Rollershutter:MAX gFFBedroomShutter "Roller Shutter" <rollershutter> (Home, FF) ["Rollershutter"]
Rollershutter FF_Bedroom_Shutter_1 "Shutter Right" <rollershutter> (FF_Bedroom, gFFBedroomShutter, gFFShutter) ["Rollershutter"] {channel="shelly:shelly25-roller:40F5202AXXXX:roller#control"}
As a last file you will have to edit your *.sitemap file and add the corresponding shutters.
Text label="Bedroom" icon="bedroom" {
	Frame label="Shutters" icon="rollershutter" {
		Default item=FF_Bedroom_Shutter_1
		Default item=FF_Bedroom_Shutter_2
		Switch 	item=gFFBedroomShutter mappings=[0.00000000="Open", 25.00000000="25%", 50.00000000="50%", 75.00000000="75%", 100.00000000="Closed"]
	}
}
As you can see there are two shutters which will be handled by up and down switches and one Switch which handles all "bedroom shutters" to open, close or 25%, 50%, 75% closed.

You might wonder why there are so many 0's behind the mappings. These are the internal values which are passed from the Shelly. In order to have the buttons "pressed" when the shutters are in that range, you will need it like this.
There are alternative ways of handing this (rules, transformers, ...) which I will cover in a seperate blog post.